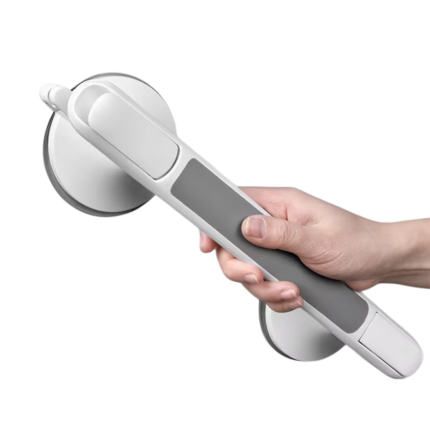
Suction bath handle with non-slip grip
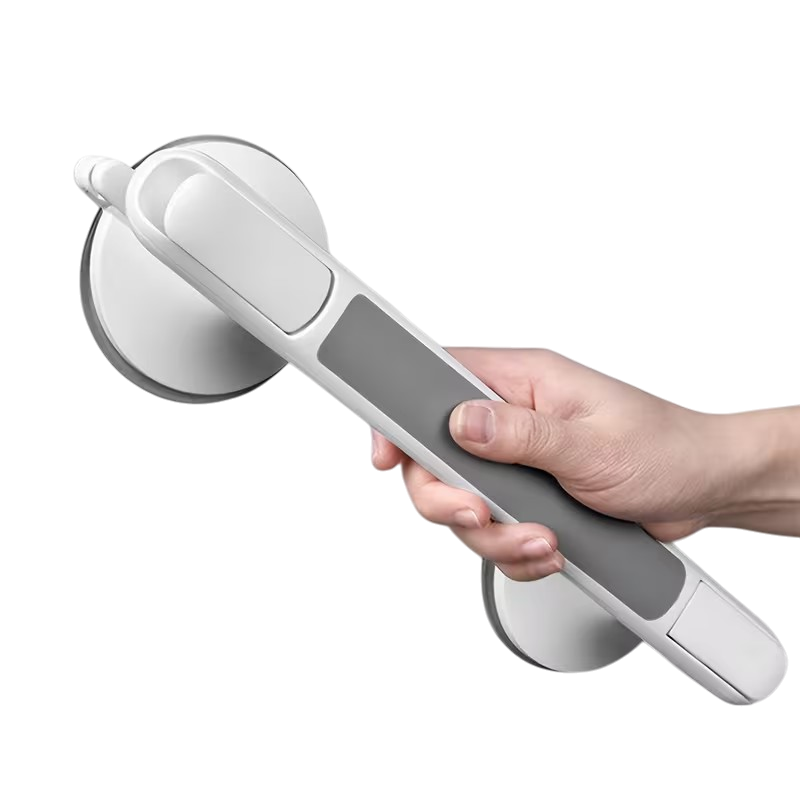
This suction cup bath grab bar provides an extra grip on the bathtub, shower area or toilet. The handle is mounted with two strong suction cups and requires no drilling, screws or permanent changes to the wall.
The non-slip grip area provides a more secure hand position during regular use. The handle can be mounted horizontally, vertically or at an angle on a suitable surface and moved again when the position needs to be changed.
Key benefits
- Provides an extra point of support in the bathroom, toilet and other areas in the home.
- Mounts with two suction cups without screws or drilling.
- Non-slip grip area provides a comfortable and stable grip.
- Locking arms make the suction cups easy to attach and release.
- Can be mounted horizontally, vertically or diagonally.
- Suitable for smooth tiles, glass, smooth metal and hard plastic.
- Can be moved between different locations as needed.
- Compact size of approximately 31.7 × 8 cm.
- Does not require tools for assembly.
Overview
This suction cup grab bar is designed for people who want an extra grip when moving around the bathtub, shower area or toilet. The two suction cups attach directly to a smooth, non-porous surface.
Each suction cup has a locking arm that activates the vacuum seal against the wall. Once both sides are properly attached, the handle can be used as a temporary support for balance and stability.
The removable design allows for repositioning without leaving drill holes, making the handle also practical in rental homes, guest bathrooms and other locations where permanent installation is not desired.
Dimensions and specifications
| Product type |
Removable support handle with suction cups |
| Material |
Plastic |
| Length |
Approx. 31.7 cm |
| Height |
Approx. 8 cm |
| Number of suction cups |
2 |
| Grip area |
Non-slip and structured surface |
| Locking mechanism |
Separate locking arms for both suction cups |
| Assembly |
Vacuum mounting without drilling and screws |
| Suitable surfaces |
Smooth, hard and non-porous surfaces |
| Location |
Bathtub, shower area, toilet and other suitable areas |
| Application |
Extra support for grip and balance |
| Package contents |
1 suction handle |
Installation without drilling
The handle is mounted directly to the wall using the two suction cups. No drill, screws, glue or other mounting tools are required.
The tool-free mounting allows you to try different placements before choosing the most practical position. The handle can also be removed and reattached once the surface and suction cups have been cleaned.
The suction cups must be placed completely on the smooth surface. They must not overlap any joints, joints, cracks or uneven areas.
Suitable surfaces
The suction handle requires a smooth, flat, hard and non-porous surface to create a vacuum.
Suitable surfaces include:
- Smooth tiles without structure.
- Glass surfaces.
- Smooth metal surfaces.
- Hard and smooth plastic.
- Other dense and even surfaces.
The handle is not suitable for rough tiles, mosaics, wood, wallpaper, painted walls, porous materials or textured surfaces. The suction cups should also not be placed over joints.
Non-slip grip area
The center of the handle has a textured surface that gives the hand a distinct area to grip around. The design helps limit hand slippage along the handle during normal use.
The handle can be placed horizontally at a bathtub, vertically in a shower area, or at an angle when this angle provides a more natural hand placement.
The handle should be placed at a height and angle that suits the person who will be using it.
Locking arm and suction indicator
Both suction cups have a separate locking arm. When the handle is correctly positioned on the wall, the locking arms are pressed down to create a vacuum.
A built-in indicator helps show whether the suction cup has normal or reduced grip. If the indicator shows reduced grip, the handle should be removed immediately, the surface cleaned and the product reattached.
The indicator does not replace a manual check. The handle should always be carefully tested before use.
How to install the handle
- Choose a smooth, hard and non-porous surface.
- Check that both suction cups can be placed outside of joints and joints.
- Clean the surface and remove limescale, soap residue, grease and dirt.
- Dry the surface and suction cups completely.
- Lift both locking arms to the open position.
- Press the suction cups evenly against the wall.
- Press the locking arms all the way down.
- Check the indicator at both suction cups.
- Pull the handle gently to check the attachment.
Do not use the handle if one of the suction cups moves, leaves the surface, or cannot maintain vacuum.
How to remove and move the handle
- Make sure that the handle is not stressed.
- Lift the locking arms to the open position.
- Carefully release the edge of each suction cup.
- Do not pull the handle hard away from the wall.
- Clean the suction cups and the new mounting area.
- Allow all surfaces to dry completely before reassembly.
Avoid using sharp objects to release the suction cups as this may damage the sealing edge.
Check the handle before each use.
Suction cups can gradually lose their grip due to moisture, limescale, temperature changes or movement, so the attachment should be checked before each use.
Pull the handle carefully without putting your full body weight on it. At the same time, check that both locking arms are closed and that the suction cups are completely tight against the wall.
Disassemble and reassemble the product if there is any sign of reduced vacuum. Never use the handle if the assembly appears insecure.
Important information about use
The handle is intended as an additional point of support for balance. It must not be used as a substitute for a permanent, fixed support handle or as the only aid in the event of a risk of falling.
Avoid placing your full body weight on the handle, hanging from it, or using it to lift your body. Individuals with significant balance or mobility issues should use a professionally fitted solution that is suitable for their specific needs.
The product should not be installed on loose, cracked or damaged tiles.
Cleaning and maintenance
Remove the handle before thorough cleaning. Wipe the handle with a soft cloth, lukewarm water and a mild detergent.
Clean the suction cups carefully and remove limescale, soap residue and dirt from the sealing edges. Do not use abrasive sponges or strong chemicals, which can damage the material.
Allow the handle and mounting surface to dry completely before reassembling. Regularly check the suction cups, locking arms and grip area for cracks, deformation or other wear.
Flexible support handle for bath and toilet
This no-drill bath suction handle combines two vacuum suction cups, a non-slip grip area and tool-free mounting. It can be placed on a variety of smooth surfaces and repositioned as your needs or decor change.
The product is intended as a temporary additional holding point and must be checked thoroughly before each use.



 Ferier og ture